
미디어 콘텐츠 스터디
Part04. 잡기 인터렉션(Grab Interaction) 본문
손 컨트롤러에 대한 구현을 합니다.
Part02. 손 컨트롤러 참고하세요
1. 잡을 수 있는 개체
1.1 이동 유형
① 하이라키 창에 Ball을 선택하고 두개 복사, 우측으로 이동하고 재질을 파랑색, 검정색으로 변경한다.

② XR Grab Interactable의 Movement Type을 다음과 같이 변경한다.
- 빨간공 : Instantaneous
- 파란공 : Kinematic
- 검은공 : Velocity Tracking

③ 실행하기

1.2 개체 접촉시 컨트롤러 해제
① 하이라키 창에 XR Origin->Right hand 선택한후 인스펙터 창에서 XR Director Interactor 컴포넌트에서 Hide controller On Select 체크한다.
② Haptic Events 속성을 다음과 같이 설정한다.
- On Select Entered 체크
Haptic Intensity : 0.3
Duration 0.1
- On Hover Entered 체크
Intensity : 0.1
Duration :0.1

③ 실행하기

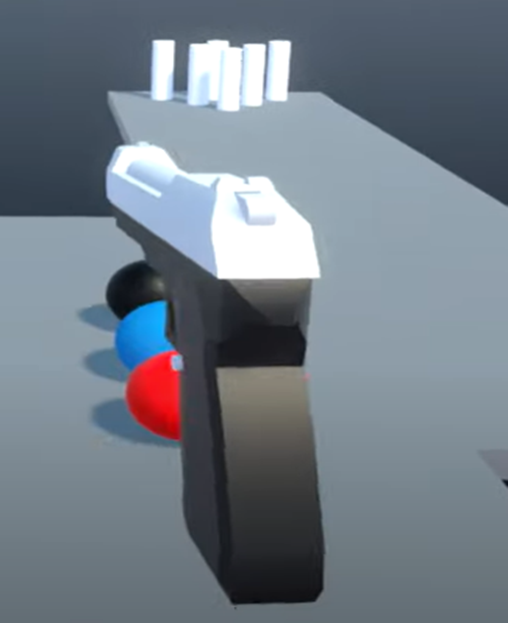
2. 총 인터렉션
2.1 총 모델 추가하기
① Gun 패키지 임포트하기
② 프로젝트 창에서 Beretta Gun모델을 추가한 후 씬으로 이동하여 프리팹으로 만들고 이름을 Beretta Gun 로 하고 Transform 컴포넌트 설정합니다.
Position(-1.12, 0.41, -0.25) , Scale(1.38, 1.38, 1.38)
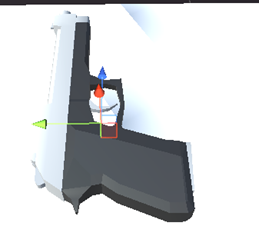
③ 하이러키 창에서 Beretta Gun을 선택하고 인스팩터 창에서 [Add Component] 클릭하여 RigidBody, XR Grab Interator , Box Collider 컴포넌트 추가하고 Box Collider 의 Center(-0.03305318, 0.003596991, 0.003555296), Size(0.2373484, 0.03599651, 0.1520698)를 총크기에 맞게 조정한다.
④ 하이러키 창에 Beretta Gun을 선택하고 인스펙터 창에 Layer의 값을 Grab으로 설정한다.
2.2 총 모델 회전시키기
① 프로젝트 창에서 Beretta Gun을 선택하고 GameObject|Create Empty메뉴를 선택하여 하위에 GameObject 추가하고 이름을 Barrel 으로 변경하고 Transform 초기화합니다. Postion(-0.165,0,-0.055) Rotation(0,-90.00001,0)
② 프로젝트 창에서 Beretta Gun을 선택하고 GameObject|Create Empty메뉴를 선택하여 하위에 GameObject 추가하고 이름을 Pivot으로 변경한다.

- 하이러키 창에 Beretta Gun 프리팹을 선택하고 툴바에서 중심점이 Pivot, 좌표계가 Local이 선택되도록 한다.
- 하이러키 창에 Beretta Gun=>Pivot 을 선택하고 인스펙터 창에서 Transform 컴포넌트 설정하여 총잡이의 위치를 조정합니다.
Position(-0.0378, 0.0003, 0.02) , Rotation(0, -90, -270)
- 프로젝트 창에서 Beretta Gun 선택하고 Beretta Gun의 Pivot을 인스펙터 창에 XR Grab Interactable의 Attach Transform에 드래그 앤 드롭하여 설정합니다.

2.3 총알 발사하기
① 하이러키 창에서 GameObject|3D Object | Sphere메뉴를 선택하여 Sphere를 추가하고 이름을 bullet으로 변경합니다.
Scale(0.041345,0.041345,0.041345)
- bullet를 선택하고 인스펙터 창에서 인스펙트 창에서 Add Componet버튼을 클릭하여 Rigidbody를 추가합니다.
② 하이러키 창에서 Beretta Gun을 선택하고 인스펙트 창에서 Add component 버튼을 클릭하여 Audio Source 컴포넌트를 추가합니다.
③ 하이러키 창에서 Beretta Gun을 선택하고 인스펙트 창에서 Add Componet버튼을 클릭하여 Gun.cs를 작성합니다.
Gun.cs
using System.Collections;
using System.Collections.Generic;
using UnityEngine;

public class Gun : MonoBehaviour
{
    public float speed = 40;
    public GameObject bullet;
    public Transform barrel;
    public AudioSource audioSource;
    public AudioClip audioClip;

    public void Fire()
    {
        GameObject spawnedBullet = Instantiate(bullet, barrel.position, barrel.rotation);
        spawnedBullet.GetComponent<Rigidbody>().velocity = speed * barrel.forward;
        audioSource.PlayOneShot(audioClip);
        Destroy(spawnedBullet, 2);
    }
}

④ 하이러키 창에서 Beretta Gun을 선택하고 인스펙트 창에서 XR Grab Interactable 컴포넌트에 Interactable Events 속성의 Activate 에서 +클릭한다.
- 콤보박스에서 Runtime Only를 선택하고 아래에 Beretta Gun을 설정하고 오른쪽 상단의 Function에 Gun->Fire()을 설정한다.
실행하기
3. 광선검 인터렉션
① LightSaber 패키지 임포트한다.
② 프로젝트 창에서 OWLS_High모델을 추가하고 이름을 LightSaber로 변경한후 Transform 컴포넌트 설정한다.
Position(-0.737, 0.426, 0.579), Rotation(0, -120, -89.137) , Scale(0.69, 0.69, 0.69)
- LightSaber하위에 Cylinder를 추가하여 Transform 컴포넌트 설정한 후 인스펙터 창에서 Capsule Collider를 삭제합니다.
Position(-0.015, 0.242, 0), Scale(0.04460484, -0.001767, 0.04460484)
- Cylinder 를 선택하여 Emission Blue 재질을 설정합니다.
- LightSaber하위에 GameObject | Create Empty 메뉴를 선택하여 빈오브젝트추가하고 이름을 Attach로 변경합니다.
Position(0, 0.0832,0), Rotation(-28.879,102.808,8.499001)
- LightSaber를 프리팹으로 만듭니다.
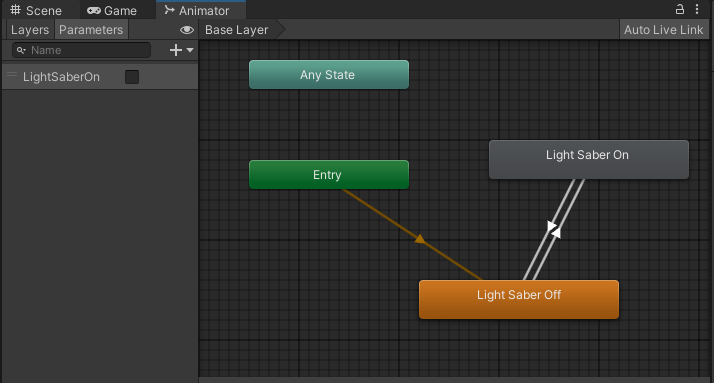
③ 하이러키 창에서 LightSaber를 선택하고 Add Componet버튼을 클릭하여 Animator 컴포넌트를 추가합니다.

- 프로젝트 창에 Animation Controller를 추가하고 이름을 LightSaber로 변경합니다.
- Animation Controller 창에서 파라미터로 Bool형의 LightSaberOn를 추가합니다.

④ 프로젝트 창에서 LightSaber 선택하고 LightSaber 의 Attach 을 인스펙터 창에 XR Grab Interactable의 Attach Transform에 드래그 앤 드롭하여 설정합니다.

⑤ LightSaber를 선택하고 Add Componet버튼을 클릭하여 LightSaber.cs 스크립트를 작성합니다.
LightSaber.cs
using System.Collections;
using System.Collections.Generic;
using UnityEngine;

public class LightSaber : MonoBehaviour
{
    public AudioClip beamAudio;

    private AudioSource audioSource;
    private Animator animator;

    // Start is called before the first frame update
    void Start()
    {
        animator = GetComponent<Animator>();
        audioSource = GetComponent<AudioSource>();
    }

    public void TriggerBeam()
    {
        bool isOn = animator.GetBool("LightSaberOn");
        if (!isOn)
            audioSource.PlayOneShot(beamAudio);
        else
            audioSource.Stop();

        animator.SetBool("LightSaberOn", !isOn);
    }
}
⑥ 하이러키 창에서 LightSaber 을 선택하고 인스펙트 창에서 XR Grab Interactable 컴포넌트에 Interactable Events 속성의 Activate 에서 +클릭한다.
콤보박스에서 Runtime Only를 선택하고 아래에 LightSaber 을 설정하고 오른쪽 상단의 Function에 LightSaber -> TriggerBeam()을 설정한다.
실행하기

'가상현실(Virtual Reality) > 가상현실 기초 다루기' 카테고리의 다른 글
| Part06. 문(Door), 서랍(Drawer), 레버(Lever) 조작 (0) | 2022.08.09 |
|---|---|
| Part05. 광선 상호작용(Ray Interaction) (0) | 2022.08.09 |
| Part03. 순간 이동(Teleportation) (0) | 2022.05.22 |
| Part02. 손 컨트롤러(Hand Presence) (0) | 2021.12.17 |
| Part01. 가상현실 시작하기 (0) | 2021.12.16 |


