04. 기본 구성 요소 - 01 장면 만들기
Three.js 애플리케이션을 구성하는 기본 구성 요소에 대해 설명합니다.
- THREE.Scene 오브젝트로 할 수 있는 작업
- 기하학와 메시의 관련성
- 직교 카메라와 원근 카메라의 차이점
장면을 만들고 오브젝트를 추가하는 방법을 살펴보는 것으로 시작하겠습니다.
1. 장면 만들기
Three.js의 핵심 개념인 THREE.Scene 입니다.
장면에 대해 가장 중요한 점은 기본적으로 렌더링할 때 사용하려는 모든 오브젝트와 조명에 대한 컨테이너라는 것입니다. 다음 표에는 THREE.Scene의 가장 중요한 기능과 속성입니다.
| 기능/속성 | 설명 | |
| add(object) | 장면에 개체를 추가하는 데 사용됩니다. 이 기능을 사용하여 오브젝트 그룹을 만들 수도 있습니다. |
|
| children | 카메라와 조명을 포함하여 장면에 추가된 모든 오브젝트의 목록이 반환됩니다. | |
| getObjectByName(name, recursive) | 객체를 생성할 때 고유한 이름을 지정할 수 있습니다. 장면 오브젝트에는 특정 이름을 가진 오브젝트를 직접 반환하는 데 사용할 수 있는 기능이 있습니다. 재귀 인수를 true로 설정하면 Three.js는 전체 오브젝트 트리를 검색하여 지정된 이름을 가진 오브젝트를 찾습니다. |
|
| remove(object) | 장면에 오브젝트에 대한 참조가 있는 경우 이 기능을 사용하여 장면에서 해당 오브젝트를 제거할 수도 있습니다. | |
| traverse(function) | children 속성은 장면의 모든 하위 목록을 반환합니다. traverse() 메소드를 사용하여 이러한 자식에 액세스할 수도 있습니다. traverse를 사용하면 모든 자식이 제공된 함수에 하나씩 전달됩니다. |
|
| fog | 이 속성을 사용하면 장면에 안개를 설정할 수 있습니다. 안개는 멀리 있는 물체를 숨기는 연무를 렌더링합니다. |
|
| overrideMaterial | 이 속성을 사용하면 장면의 모든 개체가 동일한 재질을 사용하도록 강제할 수 있습니다. | |
실습예제의 스크린 샷은 다음과 같이 표시됩니다.
코드보기
01-basic-scene.html
<!DOCTYPE html>

<html>

<head>
    <title>Example 02.01 - Basic Scene</title>
    <script type="text/javascript" charset="UTF-8" src="../../libs/three/three.js"></script>
    <script type="text/javascript" charset="UTF-8" src="../../libs/three/controls/TrackballControls.js"></script>
    <script type="text/javascript" src="../../libs/util/Stats.js"></script>
    <script type="text/javascript" src="../../libs/util/dat.gui.js"></script>

    <script type="text/javascript" src="../js/util.js"></script>
    <script type="text/javascript" src="./js/02-01.js"></script>
    <link rel="stylesheet" href="../../css/default.css">
</head>

<body>
    <div id="webgl-output"></div>
    <script type="text/javascript">
        (function () {
            // your page initialization code here
            // the DOM will be available here
            init()
        })();
    </script>
</body>

</html>
js/02-01.jsp
function init() {

    var stats = initStats();

    // create a scene, that will hold all our elements such as objects, cameras and lights.
    var scene = new THREE.Scene();

    // create a camera, which defines where we're looking at.
    var camera = new THREE.PerspectiveCamera(45, window.innerWidth / window.innerHeight, 0.1, 100);

    // create a render and set the size
    var renderer = new THREE.WebGLRenderer();

    renderer.setClearColor(new THREE.Color(0x000000));
    renderer.setSize(window.innerWidth, window.innerHeight);
    renderer.shadowMap.enabled = true;

    // create the ground plane
    var planeGeometry = new THREE.PlaneGeometry(60, 40, 1, 1);
    var planeMaterial = new THREE.MeshLambertMaterial({
        color: 0xffffff
    });
    var plane = new THREE.Mesh(planeGeometry, planeMaterial);
    plane.receiveShadow = true;

    // rotate and position the plane
    plane.rotation.x = -0.5 * Math.PI;
    plane.position.x = 0;
    plane.position.y = 0;
    plane.position.z = 0;

    // add the plane to the scene
    scene.add(plane);

    // position and point the camera to the center of the scene
    camera.position.x = -30;
    camera.position.y = 40;
    camera.position.z = 30;
    camera.lookAt(scene.position);

    // add subtle ambient lighting
    var ambientLight = new THREE.AmbientLight(0x3c3c3c);
    scene.add(ambientLight);

    // add spotlight for the shadows
    var spotLight = new THREE.SpotLight(0xffffff, 1.2, 150, 120);
    spotLight.position.set(-40, 60, -10);
    spotLight.castShadow = true;
    scene.add(spotLight);

    // add the output of the renderer to the html element
    document.getElementById("webgl-output").appendChild(renderer.domElement);

    // call the render function
    var step = 0;

    var controls = new function () {
        this.rotationSpeed = 0.02;
        this.numberOfObjects = scene.children.length;

        this.removeCube = function () {
            var allChildren = scene.children;
            var lastObject = allChildren[allChildren.length - 1];
            if (lastObject instanceof THREE.Mesh) {
                scene.remove(lastObject);
                this.numberOfObjects = scene.children.length;
            }
        };

        this.addCube = function () {

            var cubeSize = Math.ceil((Math.random() * 3));
            var cubeGeometry = new THREE.BoxGeometry(cubeSize, cubeSize, cubeSize);
            var cubeMaterial = new THREE.MeshLambertMaterial({
                color: Math.random() * 0xffffff
            });
            var cube = new THREE.Mesh(cubeGeometry, cubeMaterial);
            cube.castShadow = true;
            cube.name = "cube-" + scene.children.length;


            // position the cube randomly in the scene

            cube.position.x = -30 + Math.round((Math.random() * planeGeometry.parameters.width));
            cube.position.y = Math.round((Math.random() * 5));
            cube.position.z = -20 + Math.round((Math.random() * planeGeometry.parameters.height));

            // add the cube to the scene
            scene.add(cube);
            this.numberOfObjects = scene.children.length;
        };

        this.outputObjects = function () {
            console.log(scene.children);
        }
    };

    var gui = new dat.GUI();
    gui.add(controls, 'rotationSpeed', 0, 0.5);
    gui.add(controls, 'addCube');
    gui.add(controls, 'removeCube');
    gui.add(controls, 'outputObjects');
    gui.add(controls, 'numberOfObjects').listen();

    // attach them here, since appendChild needs to be called first
    var trackballControls = initTrackballControls(camera, renderer);
    var clock = new THREE.Clock();

    render();

    function render() {

        trackballControls.update(clock.getDelta());
        stats.update();

        // rotate the cubes around its axes
        scene.traverse(function (e) {
            if (e instanceof THREE.Mesh && e != plane) {
                e.rotation.x += controls.rotationSpeed;
                e.rotation.y += controls.rotationSpeed;
                e.rotation.z += controls.rotationSpeed;
            }
        });

        // render using requestAnimationFrame
        requestAnimationFrame(render);
        renderer.render(scene, camera);
    }
}
1.1 장면의 기본 기능
장면에 무엇이든 표시하려면 다음과 같이 4가지 유형의 구성요소가 필요합니다.
| 구성요소 | 설명 | |
| Camera | 이것은 화면에 렌더링되는 것을 결정합니다. | |
| Lights | 이는 그림자 효과를 생성할 때 재료가 표시되고 사용되는 방식에 영향을 미칩니다. | |
| Objects | 이들은 카메라의 관점에서 렌더링되는 주요 객체이며 큐브, 구 및 포인트 클라우드를 포함합니다. | |
| Renderer | 카메라와 장면의 정보를 사용하여 화면에 출력을 그립니다. | |
1.1.1 장면 생성하기
브라우저에서 html 예제를 열면 다음 스크린샷에서 볼 수 있습니다.
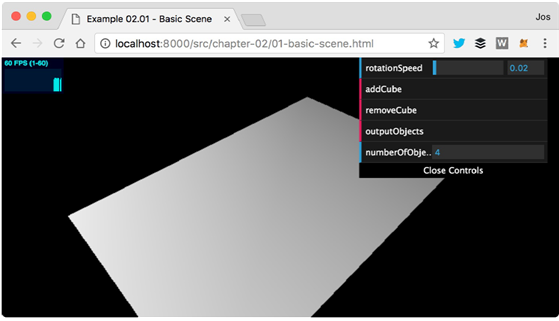
이 예제(02-02.js)의 소스를 보면, THREE.Scene, THREE.Mesh, THREE.AmbientLight, THREE.SpotLight를 추가하기는데 scene.add(object) 메소드를 사용합니다.
THREE.Camera 객체는 장면을 렌더링할 때 Three.js에 의해 자동으로 추가되므로 장면 자체에 추가할 필요가 없습니다.
위 실행 결과에 대한 다음 소스 코드를 살펴봅니다.
| <!--장면 생성하기 : THREE.Scene --> var scene = new THREE.Scene(); var camera = new THREE.PerspectiveCamera(45, window.innerWidth window.innerHeight, 0.1, 100); scene.add(camera); ... <!--지상 평면 생성하기 : THREE.Mesh --> var planeGeometry = new THREE.PlaneGeometry(60,40,1,1); var planeMaterial = new THREE.MeshLambertMaterial({color: 0xffffff}); var plane = new THREE.Mesh(planeGeometry,planeMaterial); ... scene.add(plane); <!--조명 생성하기 : THREE.AmbientLight --> var ambientLight = new THREE.AmbientLight(0x3c3c3c); scene.add(ambientLight); ... <!--조명 생성하기 : THREE.SpotLight--> var spotLight = new THREE.SpotLight(0xffffff, 1.2, 150, 120); spotLight.position.set(-40, 60, -10); spotLight.castShadow = true; scene.add(spotLight); |
1.1.2 오브젝트 추가하기
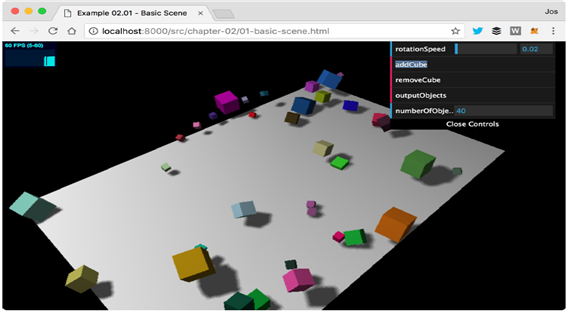
브라우저에서 html 예제를 열고 다음 스크린샷에서 볼 수 있는 오른쪽 상단 모서리에 있는 컨트롤을 확인합니다.
이러한 컨트롤을 사용하여 장면에 큐브를 추가하고 장면에 마지막으로 추가된 큐브를 제거하고 장면에 포함된 모든 현재 개체를 브라우저 콘솔에 표시할 수 있습니다. 컨트롤 섹션의 마지막 항목은 장면의 현재 오브젝트 수를 보여줍니다.
장면을 시작하면 장면에 이미 4개의 오브젝트가 있다는 것입니다.
① addCube : 큐브 추가하기
| this.addCube = function() { var cubeSize = Math.ceil((Math.random() * 3)); // 1~3사이의 임의값 var cubeGeometry = new THREE.BoxGeometry(cubeSize, cubeSize, cubeSize); // 큐브 크기 (너비, 높이, 깊이 :1~3사이의 임의값) var cubeMaterial = new THREE.MeshLambertMaterial( color: Math.random() * 0xffffff ); //큐브 색상 var cube = new THREE.Mesh(cubeGeometry, cubeMaterial); // 큐브 생성 cube.castShadow = true; cube.name = "cube-" + scene.children.length; //큐브 위치(x, y, z) cube.position.x= -30 + Math.round(Math.random() * planeGeometry.width)); cube.position.y= Math.round((Math.random() * 5)); cube.position.z= -20 + Math.round((Math.random() * planeGeometry.height)); scene.add(cube); // 장면에 큐브 추가 this.numberOfObjects = scene.children.length; //장면의 현재 오브젝트 개수 } |
② removeCube : 큐브 삭제하기
| this.removeCube = function() { var allChildren = scene.children; var lastObject = allChildren[allChildren.length-1]; // 장면의 현재 마지막 오브젝트 가져옴 if (lastObject instanceof THREE.Mesh) scene.remove(lastObject); // 오브젝트 삭제 this.numberOfObjects = scene.children.length; //장면의 현재 오브젝트 개수 갱신 } |
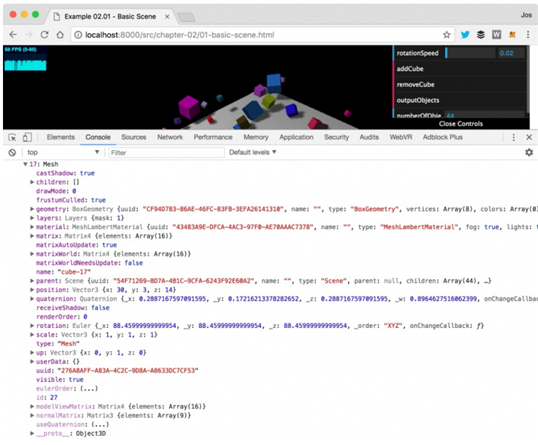
③ outputObjects : 웹브라우 콘솔에 현재 장면의 오브젝트 출력하기
현재 장면에 있는 모든 오브젝트를 웹 브라우저 콘솔에 출력합니다.
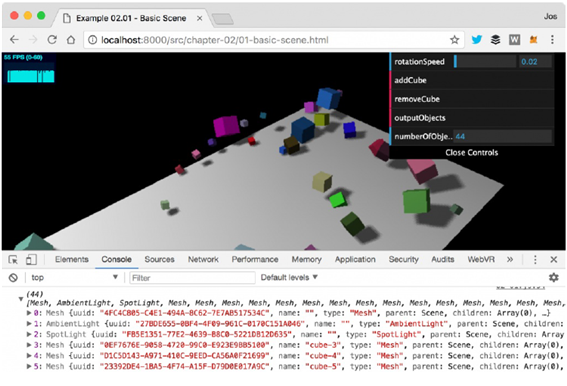
콘솔 로그에 정보를 출력하는 코드는 내장 콘솔 객체를 사용합니다.
| this.outputObjects = function() { console.log(scene.children); } |
④ numberObjects : 장면의 현재 개체 수
1.1.3 장면 렌더링하기
| function render() { stats.update(); scene.traverse(function(++6+obj) // 장면의 모든 각각 자식에 대해 호출됨 if (obj instanceof THREE.Mesh && obj != plane ) obj.rotation.x+=controls.rotationSpeed; obj.rotation.y+=controls.rotationSpeed; obj.rotation.z+=controls.rotationSpeed; ); requestAnimationFrame(render); renderer.render(scene, camera); //각 큐브의 회전을 업데이트하기 위해 render() 메서드 사용 } |
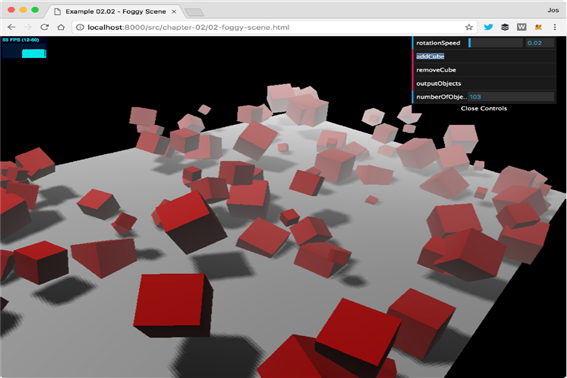
1.2 장면에 안개 추가
fog 속성을 사용하면 전체 장면에 안개 효과를 추가할 수 있습니다.
다음 스크린샷과 같이 물체가 카메라에서 멀어질수록 시야에서 더 많이 숨겨집니다.
코드보기 =>
02-foggy-scene.html
<!DOCTYPE html>

<html>

<head>
    <title>Example 02.02 - Foggy Scene</title>
    <script type="text/javascript" charset="UTF-8" src="../../libs/three/three.js"></script>
    <script type="text/javascript" charset="UTF-8" src="../../libs/three/controls/TrackballControls.js"></script>
    <script type="text/javascript" src="../../libs/util/Stats.js"></script>
    <script type="text/javascript" src="../../libs/util/dat.gui.js"></script>

    <script type="text/javascript" src="../js/util.js"></script>
    <script type="text/javascript" src="./js/02-02.js"></script>
    <link rel="stylesheet" href="../../css/default.css">
</head>

<body>

    <div id="webgl-output">

        <script type="text/javascript">
            (function () {
                // your page initialization code here
                // the DOM will be available here
                init()
            })();
        </script>
</body>

</html>
js/02-02.js
function init() {

    var stats = initStats();

    // create a scene, that will hold all our elements such as objects, cameras and lights.
    var scene = new THREE.Scene();
    // scene.fog = new THREE.FogExp2(0xffffff, 0.015);
    scene.fog = new THREE.Fog(0xffffff, 10, 100);

    // create a camera, which defines where we're looking at.
    var camera = new THREE.PerspectiveCamera(45, window.innerWidth / window.innerHeight, 0.1, 1000);

    // create a render and set the size
    var renderer = new THREE.WebGLRenderer();

    renderer.setClearColor(new THREE.Color(0x000000));
    renderer.setSize(window.innerWidth, window.innerHeight);
    renderer.shadowMap.enabled = true;

    // create the ground plane
    var planeGeometry = new THREE.PlaneGeometry(60, 40, 1, 1);
    var planeMaterial = new THREE.MeshLambertMaterial({
        color: 0xffffff
    });
    var plane = new THREE.Mesh(planeGeometry, planeMaterial);
    plane.receiveShadow = true;

    // rotate and position the plane
    plane.rotation.x = -0.5 * Math.PI;
    plane.position.x = 0;
    plane.position.y = 0;
    plane.position.z = 0;

    // add the plane to the scene
    scene.add(plane);

    // position and point the camera to the center of the scene
    camera.position.x = -40;
    camera.position.y = 20;
    camera.position.z = 40;
    camera.lookAt(scene.position);

    // add subtle ambient lighting
    var ambientLight = new THREE.AmbientLight(0x0c0c0c);
    scene.add(ambientLight);

    // add spotlight for the shadows
    var spotLight = new THREE.SpotLight(0xffffff, 1, 150, 120);
    spotLight.position.set(-40, 60, -10);
    spotLight.castShadow = true;
    scene.add(spotLight);

    // add the output of the renderer to the html element
    document.getElementById("webgl-output").appendChild(renderer.domElement);

    // call the render function
    var step = 0;

    var controls = new function () {
        this.rotationSpeed = 0.02;
        this.numberOfObjects = scene.children.length;

        this.removeCube = function () {
            var allChildren = scene.children;
            var lastObject = allChildren[allChildren.length - 1];
            if (lastObject instanceof THREE.Mesh) {
                scene.remove(lastObject);
                this.numberOfObjects = scene.children.length;
            }
        };

        this.addCube = function () {

            var cubeSize = Math.ceil((Math.random() * 3));
            var cubeGeometry = new THREE.BoxGeometry(cubeSize, cubeSize, cubeSize);
            var cubeMaterial = new THREE.MeshLambertMaterial({
                color: 0xFF0000
            });
            var cube = new THREE.Mesh(cubeGeometry, cubeMaterial);
            cube.castShadow = true;

            // position the cube randomly in the scene
            cube.position.x = -30 + Math.round((Math.random() * planeGeometry.parameters.width));
            cube.position.y = Math.round((Math.random() * 5));
            cube.position.z = -20 + Math.round((Math.random() * planeGeometry.parameters.height));

            // add the cube to the scene
            scene.add(cube);
            this.numberOfObjects = scene.children.length;
        };

        this.outputObjects = function () {
            console.log(scene.children);
        }
    };

    var gui = new dat.GUI();
    gui.add(controls, 'rotationSpeed', 0, 0.5);
    gui.add(controls, 'addCube');
    gui.add(controls, 'removeCube');
    gui.add(controls, 'outputObjects');
    gui.add(controls, 'numberOfObjects').listen();

    var trackballControls = initTrackballControls(camera, renderer);
    var clock = new THREE.Clock();

    render();

    function render() {

        trackballControls.update(clock.getDelta());
        stats.update();

        // rotate the cubes around its axes
        scene.traverse(function (e) {
            if (e instanceof THREE.Mesh && e != plane) {

                e.rotation.x += controls.rotationSpeed;
                e.rotation.y += controls.rotationSpeed;
                e.rotation.z += controls.rotationSpeed;
            }
        });

        // render using requestAnimationFrame
        requestAnimationFrame(render);
        renderer.render(scene, camera);
    }
}
추가된 안개의 효과를 가장 잘 보려면 마우스를 사용하여 확대 및 축소하면 큐브가 안개의 영향을 받는 것을 볼 수 있습니다. THREE.Fog 개체를 사용하면 안개가 선형으로 증가합니다.
안개를 활성화하는 코드
| scene.fog = new THREE.Fog( 0xffffff, 0.015, 100 ); //흰색 안개(0xffffff), 안개가 나타나는 방식을 조정(0.015 값은 근거리 속성,100 값은 원거리 속성 |
장면에 안개를 설정하는 다른 방법도 있습니다. 이를 위해 다음 정의를 사용합니다.
| scene.fog = 새로운 THREE.FogExp2( 0xffffff, 0.01 ); // 안개 색상, 밀도(0.01) |
1.3 overrideMaterial 속성
overrideMaterial 속성 사용합니다.
| scene.overrideMaterial = new THREE.MeshLambertMaterial({색상: 0xffffff}); |
이는 장면의 모든 오브젝트가 overrideMaterial 속성으로 설정된 재질을 사용하고 오브젝트 자체에 설정된 재질을 무시합니다. 이는 장면에 동일한 재질 및 재질 속성을 공유하는 많은 개체 세트가 있는 경우에 유용합니다. Three.js는 이 단일 자료만 관리하면 되므로 성능이 향상됩니다. 그러나 실제로는 이 속성을 자주 사용할 필요가 없습니다
overrideMaterial 속성을 사용하면 장면이 다음과 같이 렌더링됩니다
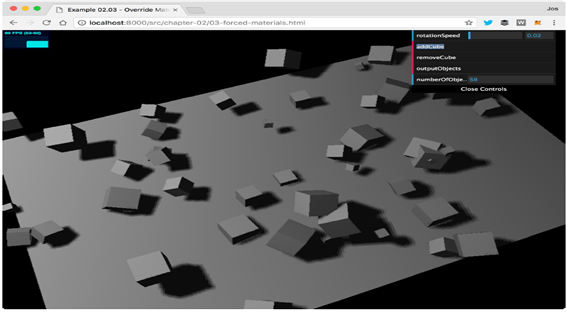
THREE.MeshLambertMaterial 오브젝트를 재질로 사용하면, 장면에 있는 조명에 반응하는 반짝이지 않는 개체를 만들 수 있습니다.